
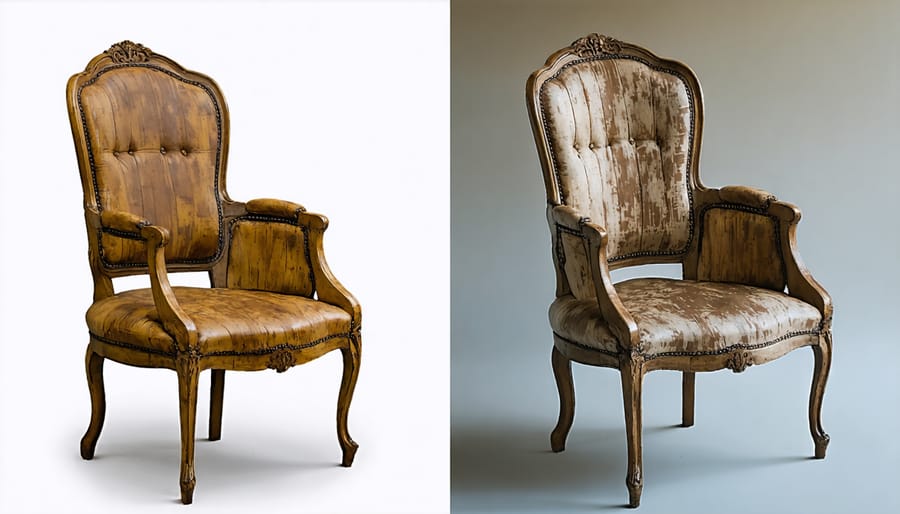
Preserving the timeless beauty of antique furniture demands mastery of professional restoration techniques that balance historical authenticity with modern craftsmanship. Each piece tells a unique story through its patina, construction methods, and original finishes – elements that require careful consideration before beginning any restoration work. Master craftsmen understand that successful refinishing starts with thorough assessment: identifying wood types, examining original finish compositions, and documenting existing damage patterns. This knowledge-driven approach ensures that every restoration decision, from gentle cleaning to complete refinishing, serves to enhance the piece’s value while preserving its historical integrity.
The art of antique furniture refinishing combines centuries-old woodworking traditions with contemporary conservation methods. Whether dealing with a Victorian dresser’s delicate veneer or a Colonial table’s weathered surface, proper technique selection becomes crucial for maintaining authenticity while achieving lasting results. This detailed guide explores time-tested methods that protect your valuable pieces during the restoration process, ensuring they continue to tell their stories for generations to come.
Successfully identifying wood types and finishes is crucial for proper antique furniture restoration. Start by examining the grain pattern – oak displays prominent cathedral patterns, while mahogany features a tight, straight grain. Maple is recognizable by its subtle grain and light color, and walnut shows rich, dark streaks throughout.
To determine existing finishes, perform a simple solvent test in an inconspicuous area. Denatured alcohol will soften shellac, while lacquer thinner affects lacquer finishes. If neither solvent works, you’re likely dealing with polyurethane or varnish. Water beading on the surface indicates a wax coating.
Look for patina – the natural aging of wood and finish that gives antiques their character. A genuine patina appears as a subtle darkening around handles, edges, and high-use areas. Period-specific construction methods also help identify both wood type and age: hand-cut dovetails and irregular saw marks typically indicate pre-1860s pieces, while uniform machine cuts suggest later manufacture.
Remember to document your findings before beginning any restoration work, as this information will guide your choice of refinishing materials and techniques.
Before beginning any antique furniture refinishing project, thorough documentation of the piece’s original condition is essential. Start by taking high-resolution photographs from multiple angles, capturing the entire piece as well as close-up shots of details, damage, and unique features. These images serve multiple purposes: they provide a reference point for your restoration work, create a valuable record for insurance purposes, and document the piece’s historical condition.
Make detailed notes about the furniture’s construction, including measurements, materials, and any maker’s marks or labels. Pay special attention to areas requiring repair, existing finishes, and hardware placement. This documentation helps guide your restoration decisions and ensures authentic reproduction of period-appropriate details.
Create a project timeline and maintain a log of all procedures, materials, and techniques used during the refinishing process. This record proves invaluable for future reference, especially if additional restoration work is needed later. For valuable antiques, consider consulting with an appraiser to document the piece’s worth before and after restoration, as proper documentation can significantly impact insurance coverage and resale value.
Chemical stripping is often necessary when dealing with stubborn finishes or multiple layers of old paint and varnish. While effective, this process requires careful attention to safety and proper technique to protect both you and the antique piece.
Always work in a well-ventilated area or outdoors, and wear appropriate protective gear including chemical-resistant gloves, safety goggles, and a respirator mask. Choose a quality stripper specifically formulated for furniture – avoid harsh methylene chloride-based products when possible, as gentler alternatives are now available.
Apply the stripper generously using a natural-bristle brush, working in small sections to maintain control. Allow the product to dwell according to manufacturer instructions – typically 15-30 minutes. You’ll notice the finish bubbling and lifting from the surface. Using a plastic scraper, gently remove the softened finish, being careful not to gouge the wood underneath.
For intricate areas and carvings, use steel wool or a stripping brush to work the product into detailed sections. Multiple applications may be necessary for particularly stubborn finishes. Once all finish is removed, neutralize the stripped surface according to the product instructions, usually with mineral spirits or water.
Allow the piece to dry completely before moving on to the sanding phase. Proper ventilation should be maintained throughout the drying process, which typically takes 24-48 hours depending on humidity levels and wood type.
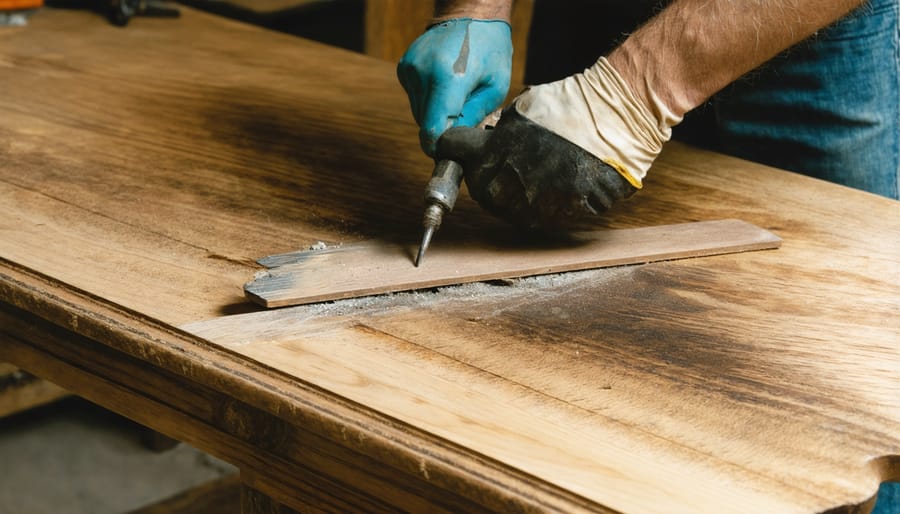
When dealing with delicate antique furniture, manual removal techniques offer precise control and minimize the risk of damage. Hand-scraping, using specialized cabinet scrapers, allows you to gently lift old finishes while preserving the wood’s patina underneath. Hold the scraper at a 45-degree angle and work in the direction of the wood grain, applying consistent but gentle pressure.
For detailed areas and intricate carvings, fine steel wool (grade 0000) can effectively remove residual finish without scratching the surface. Work methodically in small sections, frequently checking your progress to ensure even removal.
Hand sanding is essential for achieving a smooth surface while maintaining the piece’s character. Begin with medium-grit sandpaper (120-150) for initial smoothing, then progress to finer grits (220-320) for final preparation. Always sand in the direction of the wood grain to prevent cross-grain scratches that could show through the new finish.
For delicate veneers and inlays, use sanding blocks wrapped in progressively finer sandpaper. This provides better control and prevents applying too much pressure in any one area. Frequently clean the surface with a tack cloth to remove dust and check your progress.
Remember that patience is crucial when manually removing old finishes. Taking time to work carefully will preserve the piece’s historical value and ensure the best possible foundation for your new finish.
Restoring antique furniture often requires specialized wood repair techniques to address common issues like scratches, dents, and structural damage. For surface scratches, start by cleaning the affected area and applying a matching wood filler or putty. Gently sand the repair once dry, ensuring it blends seamlessly with the surrounding wood.
Deep dents can often be lifted using the steam method: place a damp cloth over the dent and apply careful heat with an iron. The wood fibers will gradually expand, raising the dented area. For more stubborn dents, wood fillers specifically designed for antique furniture can provide excellent results when properly color-matched.
Structural repairs require more expertise and careful attention. Loose joints should be carefully dismantled, old glue removed, and reassembled using appropriate wood glue for antiques. When dealing with split wood, apply wood glue into the crack, clamp the piece firmly, and allow adequate drying time. For severely damaged sections, consider using dutchman patches – precisely cut wooden pieces that replace damaged areas.
Remember to always test repair methods on an inconspicuous area first, and use materials specifically designed for antique furniture restoration. Some repairs might require professional intervention, particularly for valuable pieces where mistakes could significantly impact their worth.
Begin with a thorough cleaning of your antique piece using a mild soap solution and soft cloths to remove accumulated dirt and grime. For stubborn residues, a mixture of denatured alcohol and water can effectively break down old wax and polish without damaging the wood underneath. Always test cleaning solutions on a small, hidden area first.
Once the surface is clean and dry, start the sanding process with coarse-grit sandpaper (80-100 grit) to remove the old finish and level any deep scratches. Work in the direction of the wood grain to prevent cross-scratching. For intricate details and carved areas, use flexible sanding sponges or steel wool to maintain the original design elements.
Progress through medium-grit sandpaper (120-150 grit), continuing to follow the wood grain. This step removes any remaining scratches from the coarse sanding while preparing the surface for finer work. Pay special attention to edges and corners, where previous finishes tend to build up.
Complete the process with fine-grit sandpaper (220 grit or higher) to achieve a smooth, even surface ready for finishing. Between sanding stages, wipe the surface clean with a tack cloth to remove dust and debris. This ensures a pristine surface and allows you to spot any areas that need additional attention.
For especially delicate pieces, consider using chemical strippers before sanding to minimize wood removal and preserve original patina. Remember that over-sanding can reduce an antique’s value, so maintain a balance between restoration and preservation.
Successfully matching and applying stains to antique furniture requires both artistic skill and technical knowledge. The key to achieving authentic-looking results lies in understanding professional staining methods and color-matching techniques.
Begin by testing stains on an inconspicuous area or on a similar piece of wood to ensure compatibility and desired color. For precise color matching, consider using a combination of different stains to achieve the perfect shade. Oil-based stains offer excellent penetration and rich colors, while water-based options provide faster drying times and easier cleanup.
Apply the stain using a clean, lint-free cloth or high-quality brush, working in the direction of the wood grain. For even coverage, use long, continuous strokes and maintain a wet edge. Multiple thin coats typically yield better results than a single thick application. Allow each coat to dry completely before applying additional layers.
For antique pieces with existing finishes, consider using gel stains, which adhere well to previously finished surfaces. When working with intricate details or carved areas, use a small brush or cotton swab to ensure the stain reaches all crevices.
To achieve an aged appearance, consider techniques such as glazing or toning between stain layers. These methods can add depth and character to the piece while maintaining its historical authenticity. Remember to always seal the stained surface with an appropriate protective finish to preserve your work and protect the wood.

The final step in antique furniture refinishing is applying a protective finish, which not only enhances the beauty of your piece but also provides crucial protection against wear, moisture, and environmental damage. Traditional options include shellac, lacquer, and various types of varnish, each offering unique benefits for different applications.
Shellac, derived from natural lac resin, creates a warm, amber glow that’s particularly suited to period pieces from the 18th and 19th centuries. It’s applied in thin layers using a French polish technique, which involves carefully rubbing on multiple coats with a special pad to achieve a mirror-like finish. While beautiful, shellac is less resistant to water and alcohol than modern alternatives.
Lacquer provides excellent durability and a crystal-clear finish that won’t yellow over time. It dries quickly, allowing for multiple coats in a single day, and can be applied by brush or spray. For best results, thin the lacquer appropriately and work in a dust-free environment with proper ventilation.
Oil-based polyurethane offers superior protection and is ideal for pieces that will see frequent use. It’s available in different sheens, from matte to high gloss, and can be applied with a high-quality brush or foam applicator. Allow ample drying time between coats and light sanding for the smoothest results.
For authentic restoration of museum-quality pieces, consider traditional finishes like tung oil or beeswax. These natural options enhance the wood’s character while providing modest protection. They require more frequent maintenance but are easily renewable without stripping the entire surface.
Remember to test your chosen finish on an inconspicuous area first, and always follow manufacturer guidelines for application and safety precautions.
Mastering antique furniture refinishing requires a delicate balance of technical skill, patience, and respect for the piece’s historical value. Throughout this guide, we’ve explored the essential steps and techniques that transform tired, worn furniture into stunning showpieces worthy of their heritage. From proper assessment and preparation to selecting appropriate materials and applying finishing touches, each step plays a crucial role in achieving professional results.
Remember that successful refinishing isn’t just about the physical restoration – it’s about preserving history while breathing new life into cherished pieces. The time invested in proper preparation, including thorough cleaning, careful stripping, and meticulous sanding, will always pay dividends in the final result. Similarly, choosing the right products and techniques for your specific piece ensures both beauty and longevity in the restoration.
Patience truly is the cornerstone of quality refinishing work. Rushing through any stage of the process can lead to disappointing results and potentially damage valuable antiques. Take time to test products on inconspicuous areas, allow proper drying times between coats, and pay attention to the smallest details. Your dedication to craftsmanship will be evident in the finished piece.
As you begin your own refinishing projects, remember that each piece tells a unique story. Your role is to preserve that story while ensuring the furniture remains functional and beautiful for future generations to enjoy.