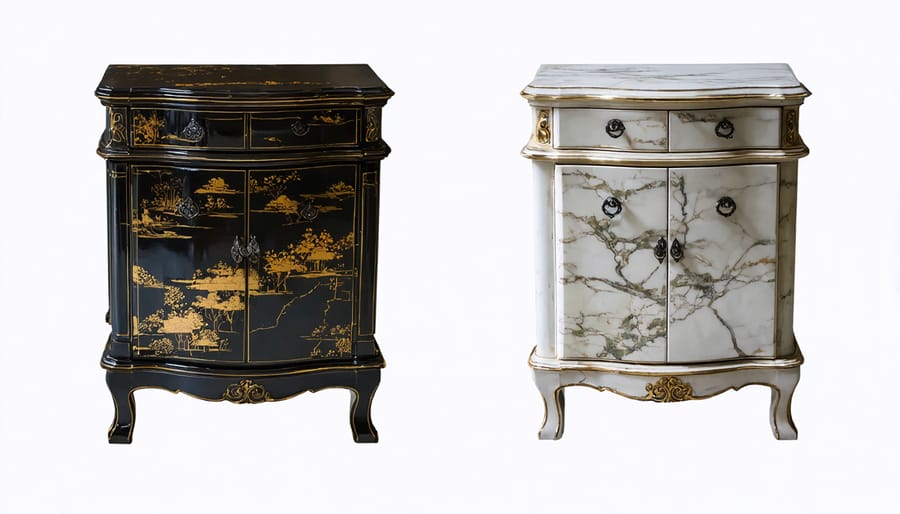
Restoring lacquered furniture demands precision, expertise, and an unwavering commitment to preserving historical craftsmanship. Master artisans have spent centuries perfecting the delicate art of breathing new life into old pieces, particularly those adorned with intricate lacquer finishes. These lustrous surfaces, prized for their mirror-like shine and durability, can suffer from age-related deterioration, environmental damage, or improper handling. Professional restoration not only preserves the monetary value of these cherished pieces but also maintains their cultural significance and artistic integrity. Whether dealing with centuries-old Asian lacquerware or mid-century modern furniture, proper restoration requires understanding complex layering techniques, authentic materials, and time-tested methods that honor the original craftsman’s vision. This comprehensive guide explores the meticulous process of lacquer furniture restoration, from initial assessment through final preservation, ensuring these valuable pieces continue to tell their stories for generations to come.
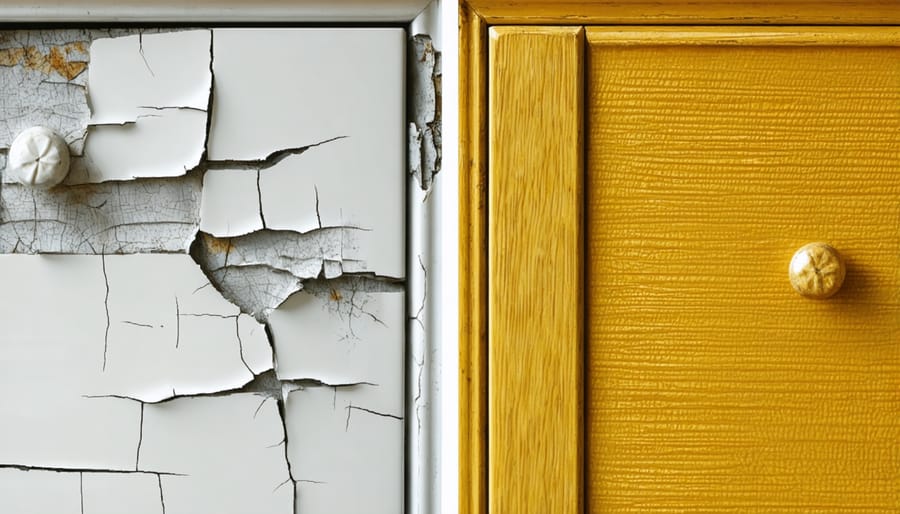
Recognizing lacquer deterioration early can help prevent extensive damage to your cherished furniture pieces. Common signs include a cloudy or yellowed appearance, which often indicates aging or exposure to harsh environmental conditions. Small hairline cracks, known as crazing, frequently appear in a spider web pattern across the surface, particularly in areas exposed to sunlight or temperature fluctuations.
Watch for white or foggy patches, which suggest moisture damage or exposure to heat. Peeling or flaking areas, especially around edges and corners, indicate the lacquer is losing adhesion to the wood underneath. Dark spots or rings usually result from water damage or prolonged contact with wet items.
Another telltale sign is the loss of shine in specific areas, creating an uneven appearance across the furniture’s surface. You might also notice areas where the lacquer has become sticky or tacky to the touch, often due to chemical exposure or extreme temperature changes. If you observe any raised or bubbled sections, this typically signals that moisture has penetrated beneath the finish, requiring immediate attention to prevent further deterioration.
Environmental factors play a crucial role in the preservation and deterioration of lacquer finishes. Temperature fluctuations can cause the lacquer to expand and contract, potentially leading to cracking or separation from the furniture’s surface. Ideally, lacquered pieces should be kept in environments with temperatures between 65-75°F (18-24°C).
Humidity is particularly impactful on lacquer finishes. High moisture levels can cause the finish to become cloudy or develop a whitish appearance, known as “blooming.” Conversely, extremely dry conditions may cause the lacquer to shrink and crack. Maintaining relative humidity between 45-55% helps prevent these issues and extends the life of your lacquered furniture.
Direct sunlight is perhaps the most damaging environmental factor. UV rays can fade and discolor lacquer finishes, particularly affecting darker colors. Extended exposure may also cause the finish to become brittle and crack over time. To protect your pieces, position them away from windows or use UV-filtering window treatments.
Regular monitoring of these environmental conditions and taking preventive measures can significantly extend the lifespan of your lacquered furniture while maintaining its original beauty and luster.
Professional lacquer furniture restoration begins with a thorough assessment process to determine the extent of damage and develop an appropriate restoration plan. Our expert craftsmen carefully examine each piece, documenting existing conditions through detailed photographs and notes – a crucial step in luxury furniture restoration.
The initial evaluation focuses on several key areas: surface damage assessment, structural integrity review, and historical significance consideration. We carefully inspect for common issues such as crackling, peeling, water damage, or UV exposure effects. Special attention is paid to identifying the original lacquer type and finish techniques used, as this information guides our restoration approach.
Documentation includes mapping out damaged areas, measuring thickness of existing lacquer layers, and noting any previous repair attempts. We also record the piece’s provenance when available, as this can influence restoration decisions, particularly for antique or historically significant items.
Our specialists then create a detailed restoration plan that outlines:
– Required repair techniques
– Estimated timeline
– Materials needed
– Special considerations for preservation
– Expected outcomes
This comprehensive assessment ensures we maintain the piece’s integrity while achieving optimal restoration results. We provide clients with this documentation, including our recommendations and proposed restoration steps, allowing for informed decisions about their valuable furniture pieces.
Proper surface preparation is crucial for successful lacquer furniture restoration. Begin by thoroughly cleaning the surface using a gentle, non-abrasive cleaner specifically formulated for lacquered surfaces. Remove any accumulated dirt, grease, or wax residue with a soft cloth, being careful not to scratch the finish.
For damaged areas, start with a careful assessment of the surface. Gently sand any rough spots or blemishes using fine-grit sandpaper (220-400 grit), always working in the direction of the wood grain. For deeper scratches, progressively work your way from medium to finer grits to achieve a smooth surface.
Remove all sanding dust using a tack cloth or vacuum with a soft brush attachment. Next, apply a chemical cleaner designed for lacquer to remove any remaining finish in damaged areas. This step requires proper ventilation and protective equipment, including gloves and a respirator.
If you encounter areas where the lacquer has completely worn away, you’ll need to feather the edges of the remaining finish to create a smooth transition. This technique involves carefully sanding the edges of the existing lacquer until they blend seamlessly with the bare wood.
Finally, wipe down the entire surface with denatured alcohol to remove any residual oils or contaminants that could affect the new finish adhesion. Allow the surface to dry completely before proceeding with the restoration process.
Professional lacquer restoration begins with careful surface preparation. The existing finish must be gently cleaned using specialized solvents to remove dirt and grime without damaging the underlying lacquer. Any chips, scratches, or areas of damage are carefully filled using color-matched lacquer putty or traditional urushi techniques for Asian pieces.
For extensive repairs, multiple thin layers of lacquer are applied, allowing each coat to dry completely before proceeding. This gradual building process ensures proper adhesion and a durable finish. Temperature and humidity control are crucial during application, as lacquer is sensitive to environmental conditions.
When refinishing, professional restorers use spray equipment to apply new lacquer in fine, even coats. This method prevents brush marks and ensures a smooth, glossy surface. Depending on the piece’s condition and desired finish, anywhere from three to eight coats may be necessary. Between coats, careful wet sanding with ultra-fine grit paper creates an exceptionally smooth surface.
For antique pieces, French polishing techniques might be employed to create a deep, rich shine that matches the original finish. This process involves carefully applying multiple thin layers of shellac using a special rubbing pad, building up the finish gradually to achieve the desired luster.
Final steps include color matching and touch-ups to ensure consistency across the entire piece. Once complete, the furniture requires several days of curing in a controlled environment before it can be handled or used. This patience ensures a beautiful, long-lasting restoration that preserves the piece’s value and beauty.
The final stage of lacquer furniture restoration requires meticulous attention to detail and thorough quality control. After allowing the final lacquer coat to cure completely, we carefully inspect the surface under bright lighting to identify any imperfections. Minor flaws can be corrected through gentle wet sanding with ultra-fine grit sandpaper, followed by polishing to restore the lustrous finish.
Quality control involves examining the piece from multiple angles to ensure consistent sheen and color matching. We verify that all repaired areas blend seamlessly with the original finish and that the overall restoration maintains the furniture’s authentic character. Special attention is paid to edges, corners, and decorative elements where lacquer application can be particularly challenging.
Before declaring the restoration complete, we conduct a final tactile inspection to confirm the surface is smooth and free from dust nibs or other irregularities. The piece is then allowed to rest in a controlled environment for at least 24 hours before being wrapped for delivery. We provide detailed care instructions to help maintain the restored finish, ensuring our clients can enjoy their rejuvenated lacquer furniture for years to come.
To maintain the beauty and longevity of your restored lacquer furniture, establishing a consistent daily care routine is essential. The first rule is to clean your furniture naturally using soft, lint-free cloths and gentle motions to remove dust and debris.
Avoid placing lacquered pieces in direct sunlight or near heat sources, as these can cause the finish to fade or crack. Maintain consistent room temperature and humidity levels, ideally between 60-70°F with 40-60% relative humidity, to prevent warping and surface damage.
When cleaning, never use harsh chemical cleaners or abrasive materials. Instead, opt for a slightly damp cloth followed immediately by a dry cloth to prevent moisture from seeping into the finish. For stubborn spots, use a mixture of mild soap and water, being careful not to oversaturate the surface.
Protect your lacquered furniture from scratches by using felt pads under decorative items and avoiding sliding objects across the surface. Regular dusting should be done with a feather duster or microfiber cloth to prevent microscratches that can dull the finish over time.
Place coasters under beverages and use placemats during meals to protect against water rings and heat damage. Address any spills immediately by blotting (never wiping) with a clean, dry cloth to maintain the furniture’s pristine condition.
Protecting your lacquer furniture from damage is essential for maintaining its beauty and value. Start by placing your furniture away from direct sunlight and heat sources, as UV rays and excessive heat can cause the lacquer to fade, bubble, or crack. Maintain consistent room temperature and humidity levels, ideally between 60-75°F and 45-55% relative humidity.
Use coasters, placemats, and protective pads under items placed on lacquered surfaces to prevent scratches and heat damage. Avoid placing hot dishes, wet glasses, or sharp objects directly on the furniture. When moving objects across the surface, always lift rather than slide them.
Regular dusting with a soft, lint-free cloth prevents particle buildup that could scratch the finish. For cleaning, use only products specifically designed for lacquer surfaces, and always test in an inconspicuous area first. Avoid harsh chemicals, alcohol-based products, or abrasive cleaners that can damage the finish.
Consider using furniture covers when the pieces aren’t in use, especially in rooms with high traffic or during renovation work. Inspect your furniture periodically for early signs of wear or damage, addressing any issues promptly to prevent them from worsening. When rearranging your space, plan the movement carefully and always have assistance when moving large pieces to avoid accidental impacts or scratches.
Professional lacquer furniture restoration stands as a crucial investment in preserving valuable heirloom pieces and maintaining the integrity of fine furniture. Throughout this guide, we’ve explored the intricate processes, specialized techniques, and expert attention required to properly restore lacquered surfaces to their former glory. The benefits of professional restoration extend far beyond mere aesthetics – they encompass the preservation of historical value, protection of financial investments, and continuation of family legacies.
When executed by skilled craftsmen, lacquer restoration can significantly extend the life of furniture pieces while maintaining their authentic character and charm. The investment in professional restoration typically pays dividends through increased furniture longevity, enhanced aesthetic appeal, and improved resale value. Our clients consistently report satisfaction not only with the immediate visual transformation but also with the lasting durability of professionally restored surfaces.
The importance of choosing experienced professionals cannot be overstated. While DIY solutions might seem tempting, the complexity of lacquer restoration requires specialized knowledge, proper tools, and refined techniques that only come through years of hands-on experience. Professional restorers understand the nuances of different lacquer types, can accurately assess damage levels, and possess the expertise to address issues without compromising the piece’s historical integrity.
Looking ahead, proper maintenance of restored lacquer furniture will ensure its beauty endures for generations to come. Regular professional assessments, coupled with appropriate care techniques, help prevent future damage and maintain the restoration’s quality. Remember that each piece of lacquered furniture tells a unique story, and professional restoration ensures these stories continue to be told through beautifully preserved surfaces that stand the test of time.