
Transform worn leather furniture into like-new condition with proven DIY repair techniques that rival professional leather repair services. Small tears, scratches, and fading spots can be effectively restored using readily available leather repair kits, saving hundreds in replacement costs. From recoloring weathered sections to patching minor damages, leather restoration is a highly achievable home project that delivers professional results when done correctly.
Master the essential skills of leather repair by understanding your material type, matching colors precisely, and applying the right techniques for specific damage patterns. Whether dealing with a beloved leather couch showing signs of wear or a vintage chair requiring careful restoration, proper preparation and high-quality repair materials make the difference between an obvious patch job and a seamless fix that stands the test of time.
Armed with the right tools and knowledge, even novice DIY enthusiasts can achieve remarkable results in leather furniture restoration. This comprehensive guide walks through every step of the repair process, from initial assessment to final finishing touches, ensuring your leather pieces maintain their beauty and functionality for years to come.
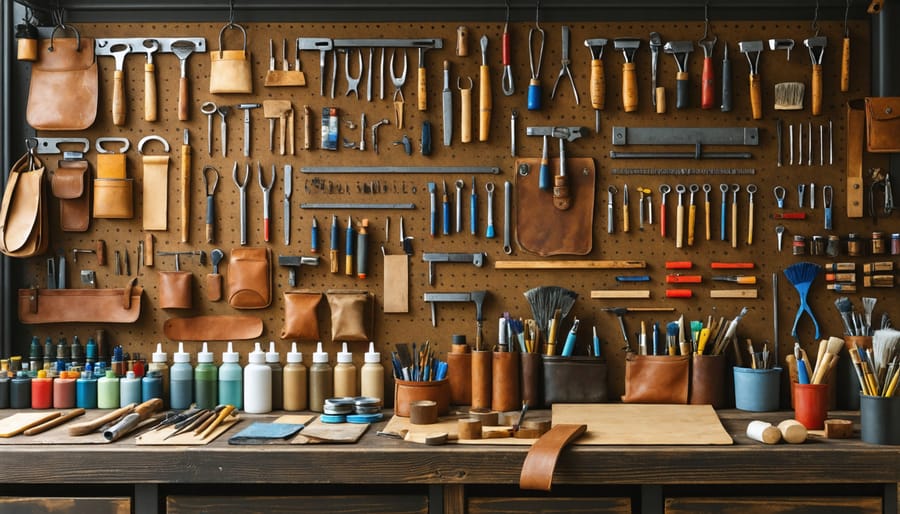
A successful leather repair project starts with having the right essential repair materials on hand. Your basic repair kit should include a quality leather filler compound, which comes in various colors and can be mixed to match your furniture’s exact shade. Look for a flexible filler that won’t crack over time.
Color matching is crucial, so invest in a good leather colorant kit with primary colors that can be blended. These typically include black, white, red, yellow, and brown. A leather prep solution is also necessary to clean and prepare the surface before applying any repairs.
For adhesion, you’ll need both a leather adhesive and a leather binder. The adhesive helps secure loose pieces, while the binder ensures the filler bonds properly with the existing leather. Don’t forget finishing supplies like a grain paper to recreate leather texture and a clear leather finish to seal and protect your repair work.
Remember to include application tools such as palette knives, small brushes, and cotton swabs for precise work. Having these materials ready before starting ensures a smooth repair process and professional-looking results.
Beyond the basic leather repair kit, you’ll need several additional tools to ensure professional-quality results. Start with cleaning supplies: leather cleaner, microfiber cloths, and cotton swabs for detailed work. A soft-bristled brush helps remove debris without scratching the leather surface.
For application precision, gather a palette knife or spatula, small mixing cups, and disposable applicator brushes in various sizes. If dealing with tears, you may need curved needles and heavy-duty thread that matches your leather color.
Don’t forget personal protection: nitrile gloves to keep your hands clean and protect against chemicals, and a dust mask when sanding or working with leather fillers. Good lighting is essential – consider a desk lamp with adjustable positioning.
For texture matching, you’ll want grain paper or a texturing mat that matches your leather’s pattern. Keep paper towels, rubbing alcohol for cleanup, and fine-grit sandpaper (600-1000 grit) on hand. A small craft knife or scissors will help with precise trimming of repair compounds.
Finally, clear workspace protection like newspaper or a drop cloth will make cleanup easier and protect surrounding surfaces.
Before attempting any leather repairs, proper cleaning and damage assessment are crucial for successful results. Start by gently wiping the leather surface with a clean, dry microfiber cloth to remove loose dirt and debris. Mix a small amount of mild leather cleaner with water according to the product instructions, then test it on an inconspicuous area first.
Using circular motions, clean the entire leather surface with a damp cloth, being careful not to oversaturate the material. Allow the leather to dry completely at room temperature – never use heat or direct sunlight to speed up the process.
Once clean, carefully examine the damage. Look for:
– Scratches and scuffs
– Tears and holes
– Color fading or discoloration
– Peeling or flaking
– Cracks in the leather
Document the size, depth, and location of each damaged area. Take photos if possible – this will help you track your progress and ensure you have the right repair materials. For extensive damage or valuable pieces, consider whether the repair is within your skill level or if professional assistance might be more appropriate.
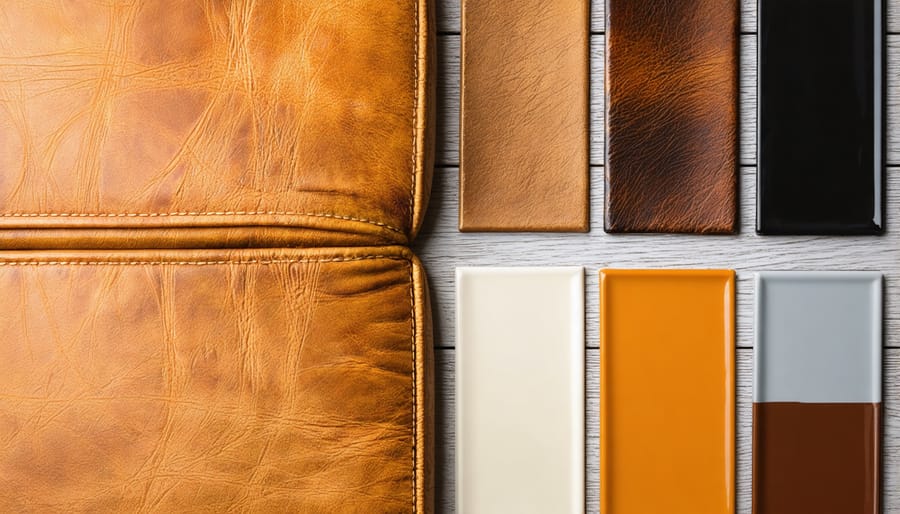
Achieving the perfect color match is crucial for a professional-looking leather repair. Start by testing your color mixture on an inconspicuous area or a leather swatch sample. For best results, mix multiple leather dyes to create a custom shade that matches your furniture. Remember that leather often has subtle variations in tone, so you may need to create slightly different shades to blend naturally with the surrounding area.
Apply thin layers of color rather than one thick coat, allowing each layer to dry completely. This approach gives you better control over the final shade and prevents oversaturation. Natural leather tends to darken when wet and lighten as it dries, so always wait for complete drying before adding more color.
For vintage or well-worn leather, consider adding a touch of antiquing solution to your color mixture to replicate the natural patina. If you’re working with two-tone or graduated leather colors, use a sponge to create a stippled effect that mimics the original texture. Keep in mind that leather color may vary slightly under different lighting conditions, so check your work under both natural and artificial light before finalizing the repair.
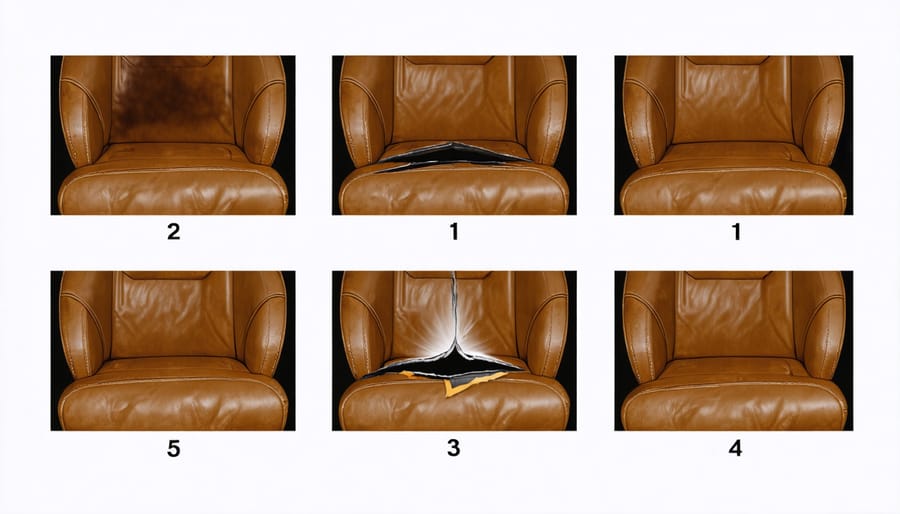
When dealing with tears and rips in leather, a systematic approach is crucial for achieving professional results. Start by thoroughly cleaning the damaged area with a leather cleaner and allowing it to dry completely. For small tears, begin by trimming any loose threads or jagged edges with sharp scissors to create clean lines.
Next, apply leather filler to the tear’s underside using a thin spatula. Work the filler into the tear carefully, ensuring it’s level with the surrounding surface. For larger tears, you’ll need to place a fabric backing beneath the tear first. Cut a piece of sub-patch material slightly larger than the tear and carefully insert it through the opening using tweezers.
Once the backing is in place, apply leather adhesive to both the backing and the underside of the tear edges. Press the edges together firmly and hold for several minutes until the adhesive begins to set. Use leather filler to smooth any remaining gaps or uneven areas.
After the filler has dried completely (usually 24 hours), sand the repaired area gently with fine-grit sandpaper until it’s flush with the surrounding leather. Match the leather’s color using a professional leather dye kit, applying thin layers until you achieve the perfect shade. Finally, seal the repair with leather finish to protect it and ensure durability.
For the best results, test all products on an inconspicuous area first, and work in a well-ventilated space. Keep in mind that complex tears or damages in high-stress areas might require professional attention for lasting results.
Surface scratches and scuffs on leather furniture are common issues that can often be addressed with simple DIY techniques. Start by cleaning the affected area with a soft, damp cloth and mild soap, then dry thoroughly. For light scratches, try gently rubbing the area with your finger – the natural oils from your skin can sometimes diminish minor marks.
For slightly deeper scratches, leather conditioner can work wonders. Apply a small amount to a microfiber cloth and work it into the scratch using circular motions. Allow it to absorb for several hours before buffing with a clean cloth. If the scratch persists, consider using a leather repair kit that matches your furniture’s color.
When dealing with scuffs, start with the gentlest approach first. Use a pencil eraser to carefully rub the scuffed area – this often removes surface marks without damaging the leather. For more stubborn scuffs, leather recoloring balm can help restore the original appearance. Apply it sparingly with a foam applicator, working in thin layers until you achieve the desired coverage.
For best results, always test any product on an inconspicuous area first. If you’re working with antiqued or specialty leather, be particularly cautious as these finishes can react differently to treatments. Remember that prevention is key – regular conditioning and proper cleaning can help leather resist scratches and maintain its resilience over time.
Keep in mind that deep scratches or cuts may require professional attention, especially if they penetrate through the leather’s surface layer.
When leather starts peeling or flaking, it’s crucial to address the issue promptly to prevent further deterioration. This common problem typically occurs in bonded or genuine leather surfaces due to wear, environmental factors, or poor maintenance. The good news is that you can effectively restore these surfaces using proven leather restoration techniques.
Start by gently cleaning the affected area with a leather-specific cleaner and a soft cloth. Remove any loose pieces of leather, being careful not to pull or tear at areas that are still well-adhered. Sand the edges of the peeling areas lightly with fine-grit sandpaper to create a smooth transition between damaged and undamaged sections.
Apply a leather binder or adhesive specifically designed for leather repair to any areas where the top layer is separating from the base. This helps prevent further peeling and creates a stable surface for subsequent repairs. Allow the binder to dry completely according to the manufacturer’s instructions.
For severe cases of peeling, you’ll need to apply a leather filler to rebuild the surface. Work in thin layers, allowing each layer to dry before adding the next. Once you’ve achieved the desired thickness, sand the repaired area carefully to match the surrounding texture.
The final step involves color matching and sealing. Use leather dye or colorant that matches your furniture’s shade, applying it with a sponge or applicator in thin, even coats. After the color has dried, seal the entire repaired area with a leather finish to protect your work and ensure durability.
Remember to test all products on a small, hidden area first to ensure compatibility with your leather type and color. While DIY repairs can be effective for moderate damage, extensive peeling may require professional intervention to achieve the best results.
After completing your repair, properly sealing the area is crucial for long-lasting results. Apply a thin, even coat of leather sealer using a clean sponge applicator, working in gentle circular motions. Allow this initial coat to dry completely for at least 30 minutes. For maximum protection, apply a second coat, ensuring you extend slightly beyond the repaired area to blend seamlessly with the surrounding leather.
Once the sealer is fully cured (typically 24 hours), apply a leather conditioner to the entire piece of furniture. This helps maintain consistent texture and prevents the repaired area from standing out. Finish with a light coat of leather protector to guard against future damage from spills, UV rays, and daily wear.
Remember to test any new products on a hidden area first, and avoid using the furniture for at least 48 hours after sealing to ensure complete curing.
After completing your leather repair, proper maintenance is crucial for long-lasting results. Similar to our proven furniture maintenance tips, leather requires regular care to preserve its beauty. Apply a quality leather conditioner every 6-8 weeks to prevent drying and cracking. Keep repaired areas away from direct sunlight and heat sources, which can cause fading and deterioration. Clean spills immediately using a soft, dry cloth, and avoid harsh cleaning products that could damage the repair work.
Create a maintenance schedule to inspect the repaired areas monthly. Look for signs of wear or separation around the edges of the repair. If you notice any issues, address them promptly to prevent further damage. Using leather protector sprays can add an extra barrier against stains and UV damage. Remember to dust regularly with a microfiber cloth and maintain proper humidity levels in your home to protect both the repair work and the surrounding leather.
With the right tools, techniques, and patience, leather repair is a rewarding DIY project that can save you significant money while extending the life of your beloved leather items. As we’ve explored throughout this guide, most common leather damage – from scratches and tears to color fading and worn patches – can be successfully addressed at home with careful attention to detail and the proper materials.
Remember to always test products on an inconspicuous area first, work in a well-ventilated space, and take your time with each repair step. While some repairs may require multiple attempts to achieve the perfect result, don’t get discouraged. With practice, you’ll develop the confidence and skills needed to tackle increasingly challenging repairs.
For best results, maintain your restored leather items by regularly cleaning and conditioning them to prevent future damage. While complex repairs might still require professional intervention, many leather imperfections can be successfully remedied through DIY methods. So gather your supplies, follow the techniques we’ve outlined, and give your leather items a new lease on life through the satisfaction of hands-on restoration.