Transform your wobbly, broken chair into a sturdy piece of furniture with professional-grade repair techniques that save hundreds in replacement costs. Master craftsmen rely on three key approaches: structural reinforcement using wood glue and clamps for loose joints, strategic dowel insertion for damaged spindles, and precision reupholstering for worn seats. Even complex repairs become manageable with the right tools and systematic diagnosis – from identifying stress points to matching wood grains for seamless fixes.
A well-executed chair repair not only restores functionality but can extend furniture life by 10-15 years. Whether dealing with a treasured antique rocker or a modern dining chair, proper repair techniques preserve both value and character. This comprehensive guide walks through essential diagnostics, repair methods, and preventive maintenance, ensuring lasting results that match professional standards.
Focus on the most common issues first: loose joints, broken rails, and damaged seat supports. These problems account for 80% of chair repairs and require minimal specialized tools. With basic woodworking skills and attention to detail, most homeowners can achieve professional-quality results in a single afternoon.
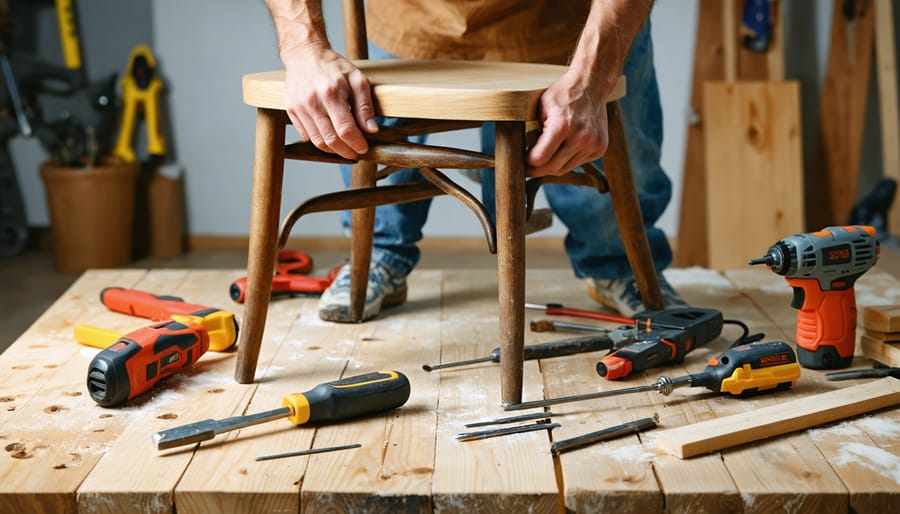
A well-equipped tool kit is essential for successful chair repair projects. Start with basic hand tools including a hammer, flathead and Phillips-head screwdrivers in various sizes, and an adjustable wrench. For wood repairs, you’ll need wood glue, wood filler, a putty knife, and sandpaper in different grits (120, 220, and 400).
Include measuring tools like a tape measure and combination square to ensure precise repairs. A rubber mallet is gentler than a regular hammer and perfect for carefully tapping joints back together. For upholstered chairs, add a staple gun with various staple sizes, pliers for removing old staples, and sharp scissors.
Keep safety equipment on hand: protective goggles, work gloves, and a dust mask. A set of clamps is invaluable for holding pieces together while glue dries. Finally, include a utility knife, small brush for applying glue, and rags for cleanup.
Store these tools in a dedicated toolbox or container to keep them organized and readily accessible for your repair projects. This basic kit will handle most common chair repairs effectively.

Selecting the right essential repair materials is crucial for successful chair repairs. For wooden chairs, opt for wood glue specifically designed for furniture, such as Titebond II or III, which offer excellent strength and water resistance. When working with upholstered pieces, fabric adhesive sprays provide secure bonding without bleeding through materials.
For hardware replacement, always match the size and style of existing screws and bolts. Choose stainless steel or brass fasteners for their durability and resistance to corrosion. Corner brackets should be selected based on the chair’s weight capacity and design, with heavy-duty options for dining chairs and lighter versions for occasional seating.
Keep a variety of wood screws on hand, typically ranging from #8 to #10 in various lengths. For joints that experience heavy stress, consider using reinforcement plates or L-brackets alongside your adhesive. When working with veneer repairs, use contact cement specifically formulated for wood veneers, and always test adhesives on a small, hidden area first to ensure compatibility with your chair’s finish.
Before diving into repairs, it’s crucial to thoroughly assess your chair’s structural integrity. Start by examining all joints, particularly where different parts connect. Gently rock the chair to identify wobbling or loose components – these often indicate compromised joints that need immediate attention. When exploring furniture restoration techniques, always check for these common structural issues:
Look for splits or cracks in the wood, especially around stress points like the seat joints and back supports. These weaknesses can worsen over time if left unaddressed. Pay special attention to weight-bearing areas, such as leg joints and seat supports, as these typically show the first signs of structural failure.
Inspect all dowels, tenons, and mortise joints for signs of separation or damage. A loose joint might appear as a visible gap or feel unstable when pressure is applied. Check underneath the seat for broken support blocks or loose corner blocks, which are essential for maintaining the chair’s stability.
For upholstered chairs, press firmly on the seat and listen for creaking sounds that might indicate broken springs or damaged support webbing. These internal structural issues require attention before they compromise the entire chair’s integrity.

Begin your surface damage assessment by carefully examining the chair in good lighting. Common issues include scratches, ranging from light surface marks to deep gouges, dents from impacts, and worn or damaged finish. For light scratches, try rubbing a walnut or matching wood marker along the grain – the natural oils often blend seamlessly with the wood’s finish.
Deeper scratches require more attention. Use fine-grit sandpaper (220-grit or higher) to smooth the affected area, always working with the wood grain. For dents, particularly on solid wood chairs, you can often raise the compressed wood fibers using steam. Place a damp cloth over the dent and apply brief contact with a warm iron – the steam will help the wood fibers expand back to their original position.
Finish problems like water rings, sun fading, or peeling require different approaches. White rings from water damage often respond well to gentle buffing with furniture polish. For more severe finish damage, you may need to strip and refinish the affected area. Always test repair methods in an inconspicuous spot first to ensure compatibility with your chair’s existing finish.
Remember that some surface damage adds character to antique pieces, so consider whether full restoration aligns with your chair’s style and value.
Loose joints are one of the most common issues with chairs, often resulting in wobbling and instability. The key to a successful repair lies in properly cleaning and regluing these connections. Start by carefully disassembling the loose joint, removing all old glue residue with sandpaper or a chisel. Clean both surfaces thoroughly with denatured alcohol to ensure optimal adhesion.
For wooden chairs, use high-quality wood glue, applying it evenly to both surfaces of the joint. Yellow carpenter’s glue works well for most repairs, while polyurethane glue is better for outdoor furniture. Insert the joint pieces together, ensuring they’re properly aligned, and clamp them firmly. Use multiple clamps if necessary to maintain even pressure, and wipe away any excess glue with a damp cloth.
For added strength in critical joints, consider reinforcement techniques. Wood dowels can provide excellent additional support – drill matching holes in both pieces and insert glue-coated dowels before reassembly. Corner blocks, small triangular pieces of wood glued and screwed into interior corners, can also significantly strengthen joints.
Allow joints to dry completely according to the glue manufacturer’s instructions – typically 24 hours for full strength. Don’t rush this process, as premature use can compromise the repair. For chairs that receive heavy use, consider adding mechanical fasteners like screws or brackets after the glue has dried, especially in stress points like where the seat meets the legs.
Regular maintenance checks can help identify loose joints before they become serious problems. Listen for creaking sounds and check for movement in joints periodically, addressing issues promptly to prevent further damage.

When a chair part is beyond repair, replacement becomes necessary. Start by identifying the exact component that needs replacing – whether it’s a spindle, seat slat, or chair leg. Take precise measurements of the damaged part, including length, width, and any unique angles. This ensures your replacement piece will fit perfectly.
For wooden components, select lumber that matches the original material as closely as possible. Pine, oak, and maple are common choices, but consider both appearance and durability. If you’re replacing upholstered parts, choose fabric or leather that complements the chair’s style while offering appropriate durability for its intended use.
To replace a broken chair leg, carefully remove the damaged piece by unscrewing it or gently separating it from the joint. Clean the joint area thoroughly and remove any old glue or debris. Shape the new leg to match the original’s dimensions using basic woodworking tools. Test-fit the replacement before final installation, ensuring it sits level with the other legs.
For spindle replacement, extract the broken piece without damaging the surrounding wood. Create a new spindle that matches the original’s profile using a lathe or hand tools. Before installation, apply wood glue to both ends and secure it firmly in place using clamps until the adhesive dries completely.
When replacing seat components, remove the old material entirely, including staples and padding. Cut new materials to size, leaving extra allowance for wrapping around edges. Layer materials in the correct order: support webbing, padding, fabric, and finally, secure everything with a staple gun, working from the center outward to ensure even tension.
Remember to allow proper drying time for adhesives and finishes before using the chair.
Restoring your chair’s upholstery can breathe new life into your furniture while saving money. Before diving into any upholstery repair techniques, assess the extent of damage and gather necessary materials like fabric, thread, needles, scissors, and upholstery staples.
For minor tears, start by cleaning the area around the damage. Small rips can often be mended using curved upholstery needles and matching thread. Work from the underside when possible, using small, tight stitches to create a nearly invisible repair. For leather chairs, specialized leather patches and adhesive will provide better results than traditional stitching.
When dealing with loose or sagging fabric, remove the existing staples carefully using a staple remover. Pull the fabric taut and secure it with new upholstery staples, working from the center outward to ensure even distribution. Always place staples about half an inch apart for optimal hold.
For more extensive damage or worn-out upholstery, complete replacement might be necessary. Begin by carefully removing the old fabric, taking photos and notes of the original pattern pieces and their placement. Use these as templates for cutting new fabric. Remember to account for pattern matching and additional material for wrapping around edges and corners.
When reupholstering, start with the seat bottom, followed by the back and arms. Maintain consistent tension as you work to prevent wrinkles or sagging. Use a pneumatic staple gun for professional results, and finish edges with decorative trim or piping to conceal staples.
For the best long-term results, choose appropriate fabric weight and durability for your chair’s intended use. Heavy-duty upholstery fabric rated for high traffic areas will last longer in frequently used chairs, while delicate fabrics may be suitable for occasional seating.
Regular maintenance is crucial to extend furniture lifespan and prevent costly repairs. Start by inspecting your chairs monthly for loose joints, wobbling, or unusual sounds. Tighten any visible screws or bolts immediately, using appropriate tools to avoid stripping the hardware.
Keep wooden chairs away from direct sunlight and maintain consistent humidity levels to prevent wood from warping or cracking. Clean chairs regularly with appropriate products – use mild soap and water for wooden surfaces, and specialized cleaners for upholstery. Avoid harsh chemicals that can damage finishes or fabrics.
Apply furniture wax to wooden chairs every six months to protect the finish and maintain moisture balance. For upholstered chairs, vacuum regularly and treat stains promptly to prevent permanent damage. Consider using furniture pads under chair legs to prevent floor scratches and reduce stress on joints.
When moving chairs, always lift rather than drag them to protect both the chair and floor. Train family members and guests to avoid rocking or leaning back in chairs, as this behavior often leads to loose joints and structural damage. For office chairs, lubricate moving parts annually and check casters for debris buildup.
By following these preventive measures, you’ll significantly reduce the need for repairs and maintain your chairs’ appearance and functionality for years to come.
With the right tools, knowledge, and patience, chair repair is a rewarding DIY project that can save you money while preserving cherished furniture pieces. As we’ve explored throughout this guide, most common chair issues can be successfully addressed at home, from wobbly legs to torn upholstery. Remember to always start with a thorough assessment of the damage, gather the appropriate tools and materials, and follow the repair steps methodically.
Don’t be intimidated by seemingly complex repairs – start with smaller projects to build your confidence and skills. Keep safety in mind by wearing appropriate protective gear and working in a well-ventilated area. Regular maintenance checks can prevent major issues from developing, extending the life of your chairs significantly.
Whether you’re fixing a loose joint, replacing worn cushioning, or refinishing a wooden surface, the satisfaction of completing the repair yourself is immeasurable. Take pride in giving your chairs a second life and developing valuable DIY skills along the way. With practice, you’ll find that many furniture repairs are well within your capabilities, leading to both cost savings and a sense of accomplishment.