Preserving historic furniture requires a careful balance of gentle cleaning, environmental control, and knowing when professional intervention is necessary. Most pieces dating from the 18th to early 20th centuries can be maintained by owners using pH-neutral cleaners, microfiber cloths, and simple wax applications, but structural repairs, veneer work, and finish restoration demand specialized skills that prevent irreversible damage.
The value in caring for these pieces extends beyond money. A Federal-era sideboard or Victorian dining set connects us to craftsmanship standards and materials we rarely see today. Hand-cut dovetails, old-growth timber, and natural shellac finishes tell stories that mass production erased. When homeowners understand basic preservation principles, they protect both heritage and investment.
The challenge lies in distinguishing routine care from situations requiring expert help. Dusting and waxing a mahogany table falls well within DIY territory. Stabilizing a cracked leg joint or addressing finish alligatoring crosses into restoration work where amateur attempts often cause more harm than good. Insurance adjusters and property managers handling estate pieces face similar questions: which tasks preserve value, and which require documented professional treatment?
This guide walks through the tools, techniques, and safety considerations for maintaining historic furniture at home. You’ll learn how to assess condition, execute basic preservation tasks, and recognize warning signs that point toward professional restoration. The goal is confident, informed care that keeps heirloom pieces functional and beautiful for another generation.
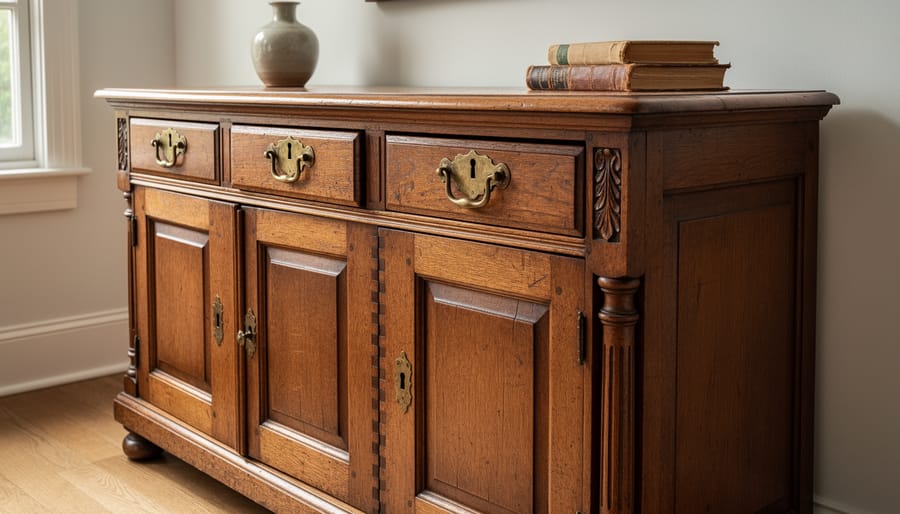
Historic furniture earns its designation through a combination of age, craftsmanship, and cultural significance. Generally, pieces over 100 years old qualify as antique, while those from 20 to 100 years fall into the vintage category. However, age alone doesn’t tell the whole story. The construction methods matter enormously: hand-cut dovetails, mortise-and-tenon joinery, and hand-planed surfaces reveal techniques that modern manufacturing has largely abandoned. Materials also distinguish historic pieces. Old-growth lumber, now virtually unavailable, displays tighter grain patterns and superior stability compared to today’s fast-grown wood. Original hardware, whether hand-forged nails or early machine-made screws, serves as a timestamp for the piece’s era.
Provenance adds another layer of value. A documented history connecting a piece to a notable maker, historical event, or prominent family transforms ordinary furniture into a tangible link to the past. This background information often determines whether a chair is worth $200 or $20,000.
Preservation differs fundamentally from standard furniture repair because the goal shifts from making something look new to maintaining its authentic character. Standard repair prioritizes function and appearance, often replacing damaged components entirely. Preservation seeks to stabilize and protect original materials, accepting that wear and age marks tell part of the piece’s story. You wouldn’t sand away the patina on a 200-year-old tabletop the way you might refinish a damaged modern table.
Value considerations guide your approach. Historical significance might make even a humble piece worthy of museum-quality conservation. Monetary value, established through appraisals or comparable sales, helps justify professional restoration costs. Sentimental value matters too, though personal attachment sometimes clouds judgment about appropriate treatment methods.
When professional help becomes essential depends on the piece’s rarity and condition. Museum-quality items, structurally unsound frames, unknown finishes that might contain hazardous materials, or pieces requiring period-specific techniques all warrant expert intervention. Simple cleaning and stabilization of a moderately valuable piece might suit a careful DIY approach, but err toward professional consultation when uncertainty exists.
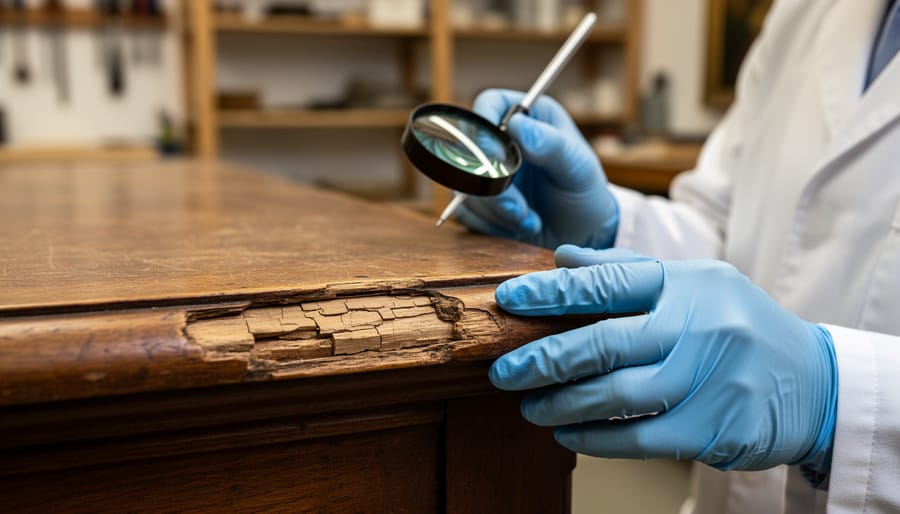
Before you apply a single cleaning solution or tighten a loose joint, you need to understand exactly what you’re working with. A thorough assessment prevents irreversible mistakes and helps you determine whether a piece requires professional intervention or can be handled with careful DIY techniques.
Start by examining the piece in good natural light, preferably near a window. Take photographs from multiple angles, front, back, sides, top, bottom, and close-ups of any damage, maker’s marks, or distinctive features. These photos serve as your baseline documentation and prove invaluable if you later need to consult a professional or file an insurance claim.
Look closely at the wood itself. Is it solid hardwood throughout, or does it feature veneer over a secondary wood? Run your fingers along edges and joints to feel the grain direction and identify any loose or lifting veneer. Common historic furniture woods include walnut, mahogany, oak, cherry, and maple, each with distinct grain patterns and colour characteristics. The wood type influences both the piece’s value and the appropriate preservation techniques.
Examine the construction methods next. Historic furniture reveals its age through details like hand-cut dovetails (irregular spacing indicates hand craftsmanship), mortise-and-tenon joints, wooden pegs instead of screws, and square-headed nails rather than modern round ones. Check underneath, inside drawers, and on the back panels where original construction remains most visible.
Before proceeding with any work, systematically evaluate these critical factors:
Measure and record dimensions, especially if parts are missing or damaged. A drawer front that once had hardware will show screw holes or mounting impressions that indicate original size and placement. These measurements become crucial if you need to source replacement elements.
Take the time to research similar pieces if possible. Furniture reference books, museum collections, and auction records help establish what original features should look like and alert you to later modifications that might have compromised historical integrity. This detective work pays dividends when you move to the actual preservation phase.
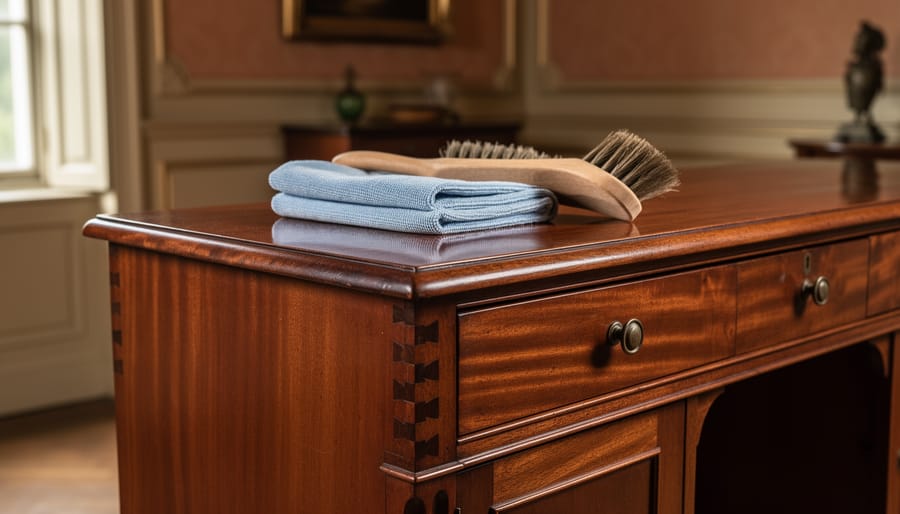
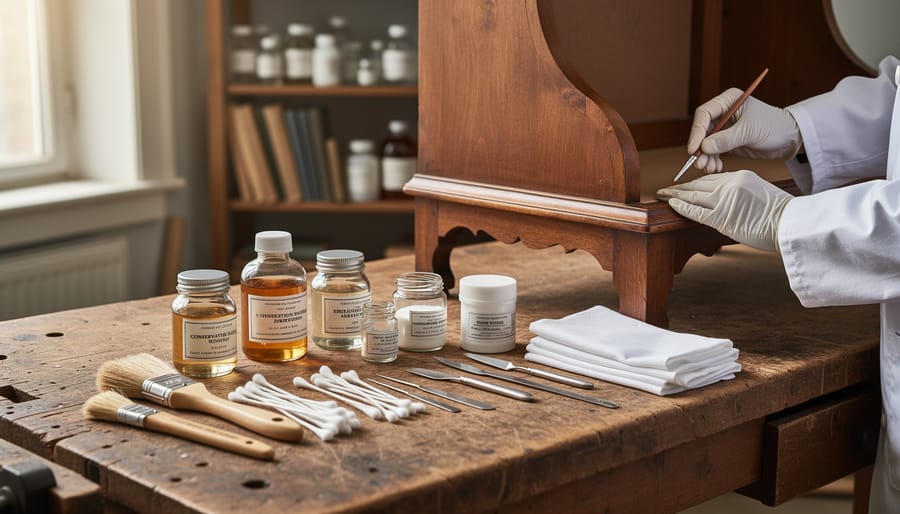
Working with historic furniture demands tools that offer precision without the aggressive force of modern power equipment. Hand planes with adjustable blades let you shave whisper-thin layers from swollen joints or uneven surfaces, giving you complete control over material removal. A quality cabinet scraper, properly sharpened and burnished, removes old finish or smooths wood without tearing fragile grain patterns.
Invest in brass-bristled brushes for cleaning carved details and crevices; unlike steel, brass won’t scratch softwood or damage gilding. Natural boar-bristle brushes apply waxes and oils evenly on delicate surfaces. For intricate work around inlay or veneer, dental picks and bamboo skewers safely remove debris from tight spaces without gouging.
Japanese pull saws cut on the backstroke with minimal vibration, reducing stress on fragile joinery. Keep several grades of flexible scrapers (from cabinet scrapers to curved goosenecks) for accessing different contours. Cotton swabs, soft cloths, and artist’s brushes in various sizes handle cleaning and finish application in detailed areas.
A jeweler’s loupe or magnifying glass reveals hidden damage, original tool marks, and construction details that inform your approach. These specialized hand tools cost more upfront but prevent irreversible mistakes that power tools make in seconds.
When working with historic pieces, reversibility is essential because future conservators may need to undo your work without damaging the original. This principle guides every material choice.
For adhesives, hide glue remains the gold standard. It bonds strongly, yet responds to heat and moisture, allowing joints to be separated cleanly decades later. Modern polyvinyl acetate (PVA) glues can work for certain applications, but avoid epoxies and polyurethanes, they create permanent bonds that force destructive removal.
Wood fillers should match the original material. Shellac sticks in various colors let you build up missing sections gradually, and they remain removable with alcohol. Avoid plastic wood fillers that shrink, crack, and resist future intervention.
Traditional finishing oils like boiled linseed oil and tung oil penetrate wood fibers and can be refreshed or removed. Paste waxes, particularly microcrystalline types, protect surfaces without obscuring original patina. These finishes wear gracefully and won’t trap moisture or yellow unpredictably like many synthetic coatings. They also allow the wood to breathe, preventing long-term moisture problems that plague pieces sealed with impermeable modern varnishes.
Working with historic furniture demands heightened safety awareness because pieces manufactured before modern regulations often contain materials now known to be hazardous. Lead-based paint, commonly used until 1978, poses the most widespread risk, disturbing it through sanding, scraping, or heating releases toxic dust that’s especially dangerous to children and pregnant women. Before beginning any work on furniture from this era, test for lead using a home kit or hire a certified inspector; if present, follow EPA lead renovation rules or leave the work to licensed professionals equipped with proper containment systems.
Old finishing products present another layer of concern. Shellac, lacquer, and varnish from decades past may have been mixed with toxic pigments containing arsenic, mercury, or chromium compounds. Stripping these finishes releases volatile organic compounds that require excellent ventilation, work outdoors or in a space with cross-ventilation and exhaust fans, never in a closed garage or basement. Wear an organic vapor respirator rated for solvents, not just a dust mask, along with nitrile gloves and eye protection.
Structural instability poses physical hazards distinct from chemical risks. Antique chairs and tables with weakened joints can collapse unexpectedly during handling or repair, causing injury and further damage to the piece. Always support furniture adequately before disassembly, use padded sawhorses, and never work alone when moving heavy pieces.
Evidence of past pest infestations, powder post beetles, termites, or furniture beetles, requires careful assessment. Active infestations demand professional treatment using integrated pest management approaches rather than DIY pesticide application, which can damage wood and finishes while exposing you to additional chemicals. If you discover extensive pest damage compromising structural integrity, consult a restoration specialist before proceeding with any preservation work.
Start with dry methods before introducing any moisture. Use a soft brush or vacuum with cheesecloth over the nozzle to remove loose dust and cobwebs from crevices, carved details, and joints. Work systematically from top to bottom, paying special attention to hidden areas where decades of grime accumulate.
For surface dirt, begin with microfiber cloths and distilled water. Test any cleaning approach on an inconspicuous spot first. If water alone proves insufficient, use a mild solution of one part white vinegar to eight parts water, applied sparingly with a barely-damp cloth. Never saturate the wood or allow liquid to pool in joints or on antique chair upholstery.
For stubborn grime on finished surfaces, mineral spirits on a cotton swab can dissolve old wax and oils without harming most stable finishes. Apply in small circular motions, changing swabs frequently to avoid redistributing dirt. This gentle furniture cleaning technique prevents abrasion while lifting embedded soil.
The critical skill is recognizing when to stop cleaning to preserve valuable patina. If you reach a layer where the surface shows natural aging, oxidation, or original color variations, halt immediately. Patina represents authentic history and adds both character and value. Over-cleaning creates an artificially bright appearance that diminishes authenticity and can expose vulnerable wood to environmental damage.
Structural repairs form the foundation of successful preservation. Before applying any adhesive, disassemble only what’s necessary, forcing apart tight joints risks splitting original wood. Use warm water or steam to soften old hide glue gently, never pry with excessive force.
For loose mortise-and-tenon joints, the gold standard remains hide glue. This traditional adhesive remains reversible with heat and moisture, allowing future conservators to make adjustments without damaging the piece. Clean out old glue residue with a dental pick or thin chisel, then apply fresh hide glue at the proper temperature. Clamp carefully using padded blocks to distribute pressure evenly across the joint.
Cracks require thoughtful intervention. Surface cracks that don’t affect stability often need nothing more than gentle cleaning. Through-cracks that compromise strength should be stabilized with thin hide glue injected using a syringe, then clamped until fully cured. Avoid modern epoxies, they’re permanent and incompatible with wood’s natural expansion and contraction.
Missing pieces present a judgment call. Small losses can be filled with tinted wax or reversible wood putty. Larger structural elements may require careful reproduction using period-appropriate wood species and traditional joinery methods. The replacement should be distinguishable upon close inspection, preserving historical honesty while restoring function. Always document which components are replacements in your conservation record.
Surface damage tells the story of a piece’s life, but knowing when that story needs editing, and when it should remain untouched, separates thoughtful preservation from destructive over-restoration. Your goal here is stabilization and protection, not creating a brand-new appearance.
Start by identifying what you’re actually seeing. Water rings indicate finish damage, not wood damage, the cloudiness sits in the shellac or lacquer layer. Scratches that catch your fingernail have penetrated the finish; those that don’t are surface-level. Veneer lifting or bubbling signals adhesive failure beneath. Each problem has a proportional solution.
For minor scratches and worn areas, spot-touching preserves the original finish while addressing damage. Clean the area with mineral spirits, let it dry completely, then apply matching finish with a fine artist’s brush, building thin layers rather than one thick coat. Feather the edges where new finish meets old. This targeted approach maintains the patina and aging patterns that give historic furniture its character.
Water rings often respond to gentle abrading with 0000 steel wool dipped in mineral spirits, working with the grain. For stubborn rings, a paste of rottenstone and linseed oil rubbed gently can level the damaged finish without removing it entirely.
Complete refinishing should be your last resort, reserved for pieces where the finish has failed so extensively that the wood itself faces damage from exposure. Even then, document the original finish thoroughly, future conservators will thank you.
Once your structural repairs and surface restoration are complete, the final protective coating serves as the crucial barrier between your historic furniture and daily environmental stresses. This step requires careful consideration because the wrong finish can trap moisture, obscure original patina, or prove impossible to remove without damage.
For most historic pieces, traditional paste wax remains the gold standard. A high-quality carnauba or beeswax-based paste applied in thin layers creates a protective barrier while allowing the wood to breathe. Apply with a soft cloth using circular motions, let it haze for 10-15 minutes, then buff to a soft sheen with clean cotton. Two thin coats provide better protection than one heavy application.
Renaissance Wax, developed by the British Museum, offers a microcrystalline wax formula specifically designed for conservation work. It resists fingerprints and moisture while remaining completely reversible with mineral spirits.
For pieces that will see regular use, boiled linseed oil or tung oil provides deeper penetration and durability. Apply sparingly with a lint-free cloth, allow 15-20 minutes for absorption, then wipe away all excess. Multiple thin coats applied days apart build protection gradually without creating a surface film that might crack or yellow.
Avoid modern polyurethane or lacquer finishes on historic furniture. These create irreversible plastic layers that fundamentally alter the piece and can complicate future conservation efforts. Your goal is protection that future restorers can safely remove if needed.
After completing your preservation work, verification ensures your efforts haven’t inadvertently compromised the piece’s integrity or value. Start by conducting gentle stability tests: carefully rock the furniture to check for loose joints, apply light pressure to repaired areas, and open drawers or doors multiple times to confirm smooth operation without binding or stress. These tests should be subtle, you’re checking for improvement, not stress-testing the piece.
Assess the finish durability by examining the surface under natural light from multiple angles. Look for even sheen, proper adhesion (no tacky spots or cloudiness), and verify that protective coatings haven’t obscured original patina or grain detail. Run a clean, dry finger lightly across treated areas; the surface should feel smooth and consistent without picking up residue.
Comprehensive documentation is essential for tracking preservation history and guiding future care. Your verification checklist should include:
Create a conservation folder with before-and-after photos, receipts for archival materials, and notes about your process decisions. Store this documentation with the piece or in a secure location, it becomes part of the furniture’s provenance and proves invaluable when establishing a regular cleaning schedule or if professional assessment is needed later. This record also adds value if you ever sell or insure the piece, demonstrating proper stewardship and informed care.

Successful preservation is just the beginning, historic furniture requires consistent, thoughtful care to maintain its condition for generations. Environmental control forms the foundation of long-term preservation, because wood remains responsive to its surroundings decades or even centuries after being crafted. Keep your pieces in spaces with stable temperature and humidity levels, as dramatic swings cause expansion and contraction that weaken joints, crack veneers, and distort solid wood components. Monitor conditions with a hygrometer and adjust as needed, particularly during seasonal transitions when heating and cooling systems create rapid changes.
Light exposure silently damages historic pieces through both heat and ultraviolet radiation, which fade finishes, bleach wood, and degrade original upholstery fabrics. Position furniture away from direct sunlight and consider UV-filtering window treatments for rooms housing valuable antiques. Even artificial lighting should be moderate, high-wattage bulbs placed too close generate heat that dries wood and damages finishes over time.
Establish a gentle cleaning routine using finish-safe cleaning methods that remove dust without abrading delicate surfaces. Weekly dusting with a soft, lint-free cloth prevents buildup that scratches finishes when wiped, and annual waxing with appropriate products maintains protective coatings. Handle pieces carefully during cleaning and moving, always lift from structural points like seat frames rather than arms or decorative elements, and never drag furniture across floors.
Schedule professional inspections every two to three years, or immediately if you notice new cracks, loose joints, or finish deterioration. These check-ups catch developing problems before they require extensive intervention, protecting both the piece and your investment in its preservation. Professionals can also refresh protective coatings and adjust earlier repairs as the wood continues to settle and age.
Even well-intentioned preservation efforts can backfire spectacularly when enthusiasts make critical errors that compromise historic furniture’s integrity and value. The most devastating mistakes often stem from treating antique pieces like modern furniture or rushing the process without understanding consequences.
Aggressive cleaning ranks among the most common and irreversible errors. Stripping original patina with harsh chemicals or power sanders removes the aged surface that collectors and historians value most, the very evidence of a piece’s history. Similarly, applying water-based cleaners to shellac finishes causes clouding and whitening that can’t be undone. What appears as dirt may actually be original finish darkened with age, and once it’s gone, that authenticity disappears forever.
The temptation to use modern conveniences creates another category of damage. Power tools remove material too quickly for precision work on delicate antiques, while orbital sanders create swirl marks that penetrate through thin veneers. Hot glue guns and construction adhesives bond permanently, making future repairs impossible without causing additional damage to surrounding wood.
Critical mistakes to avoid include:
One particularly instructive case involved a Federal-period sideboard whose owner used a belt sander to “refresh” the top, removing not just finish but a full millimeter of figured mahogany and all evidence of its original surface. Professional restoration required careful inlay of period-appropriate veneer and painstaking color matching, a $3,800 correction of a fifteen-minute mistake. The piece retained function but lost much of its collector value.
The overarching error is working beyond your skill level without consulting experts first. A Victorian chair needing regluing is manageable for a careful novice; a Chippendale piece with failed mortise-and-tenon joints requires professional intervention. Knowing this boundary protects both the furniture and your investment.
Knowing when to step back and consult a professional can prevent irreversible damage to valuable pieces. If your furniture has documented provenance, museum-quality craftsmanship, or significant monetary value, professional assessment is worth the investment before you attempt any work yourself.
Complex structural issues signal the need for expert help. When joints have failed throughout the piece, when load-bearing components show extensive rot or insect damage, or when you discover hidden structural modifications from previous repairs, a professional restorer has the specialized knowledge to address these problems without compromising historical integrity. They can also identify construction techniques specific to certain periods or makers that require traditional joinery methods beyond typical DIY skills.
Unknown materials present another red flag. If you can’t identify the wood species, suspect the finish contains hazardous substances like lead or arsenic-based compounds, or notice unusual inlays or veneers, professionals have the tools and training to safely analyze and work with these materials.
Insurance claims nearly always require professional documentation and restoration. Most policies demand certified appraisals and qualified restorers to process claims for damaged antiques, ensuring proper valuation and authentic repair methods.
For those considering furniture restoration as more than a hobby, professional franchises offer structured training, proven business systems, and ongoing support. This path transforms passion into expertise while building a sustainable business around preserving historic pieces for future generations.
Timeline varies dramatically based on the piece’s condition and complexity, from a few hours for basic cleaning and stabilization to several weeks or months for comprehensive structural repairs and finish work. Unlike modern furniture repair, historic preservation cannot be rushed, proper drying times for traditional adhesives and finishes are essential to successful long-term results.
Professional preservation costs range from a few hundred dollars for minor stabilization work to several thousand for complex restoration of museum-quality pieces. Factors affecting price include the furniture’s size, damage extent, rarity of materials needed, and whether specialized craftspeople must recreate missing elements using period-appropriate techniques.
You can safely handle basic cleaning, minor tightening of loose joints, and routine maintenance on most pieces. However, structural repairs, veneer work, finish restoration on valuable items, and any work on documented antiques or heirlooms should be left to trained conservators who understand period construction methods and reversible techniques.
Reversible techniques use materials and methods that future conservators can safely undo without damaging the original piece. This matters because preservation standards evolve, and what seems appropriate today might be improved upon tomorrow, reversibility ensures your work does not permanently alter or damage the historic artifact.
Standard policies often provide limited coverage for antiques, typically capping claims at a few thousand dollars unless you have scheduled valuable items separately. Before starting any work, document your piece’s condition and value with professional appraisals, and consider adding a fine arts or collectibles rider to your policy for adequate protection.
Preservation focuses on stabilizing a piece in its current state and preventing further deterioration while maintaining original materials, finishes, and character marks. Restoration involves more active intervention to return the piece closer to its original appearance, which may include replacing damaged components, refinishing surfaces, or recreating missing elements, preservation is generally the more conservative, historically respectful approach.
These questions reflect the real concerns of people who have inherited or acquired historic pieces and want to make informed decisions about care. The distinction between preservation and restoration trips up many homeowners, preservation honors the piece’s journey through time, including its wear patterns and aged patina, while restoration attempts to erase that history. Neither approach is inherently wrong, but understanding the difference helps you make choices aligned with your goals and the piece’s significance.
Insurance considerations deserve special attention because many people discover coverage gaps only after damage occurs. If you own documented antiques or pieces with established provenance, review your policy limits now and photograph everything in detail. Professional appraisals create a paper trail that supports claims and helps you decide whether a piece warrants professional conservation work or careful DIY maintenance.
Preserving historic furniture isn’t a race against time, it’s a deliberate practice of honoring craftsmanship while ensuring these pieces remain functional and beautiful for generations to come. Throughout this guide, we’ve covered the essential techniques that balance respect for original materials with the practical realities of keeping antique furniture in active use.
The most important takeaway? Start with thorough assessment before you touch anything. Document what you have, understand its condition, and be honest about your skill level. Many historic pieces benefit from simple cleaning and stabilization rather than ambitious restoration projects. Good preservation work often means doing less, not more.
For straightforward cleaning, minor repairs, and ongoing maintenance, the techniques we’ve outlined will serve you well. Take your time, use reversible materials, and remember that preserving patina and original character matters more than achieving a pristine appearance.
However, some projects demand professional expertise, particularly valuable pieces, complex structural damage, or furniture with unknown finishes that might contain hazardous materials. Professional restorers bring specialized training, proper tools, and insurance protection that DIY approaches can’t match.
If you’ve discovered a passion for furniture restoration through this work, it’s worth knowing that skilled craftspeople are in high demand. The restoration field offers rewarding career paths for those who combine technical skill with genuine respect for historic objects.
Whether you tackle projects yourself or partner with professionals, you’re participating in an important tradition: keeping history alive through careful stewardship.